
When I have fears that I may cease to be
Before my pen has gleaned my teeming brain,
Before high-piled books, in charact'ry,
Hold like rich garners the full-ripened grain;
When I behold upon the night's starred face
Huge cloudy symbols of a high romance,
And think that I may never live to trace
Their shadows, with the magic hand of chance;
And when I feel, fair creature of an hour,
That I shall never look upon thee more,
Never have relish in the faery power
Of unreflecting love! -then on the shore
Of the wide world I stand alone, and think,
Till Love and Fame to nothingness do sink.

                                       by John Keats
Monthly Archives: November 2007
The Cathedral and the Bazaar
Interesting podcast over at IT Conversations today featuring by Tim O’Reilly on the subject of what constitutes Open Source and the nature of freedom in Open Source. You can download or listen to the podcast here.
I enjoyed listening to Tim talk about how the nature of Open Source is changing or even needs to change with reference to Web 2.0, how Open Source isn’t just about source code or slapping an OSI license onto code anymore. It’s a fairly short talk but well worth listening to.
 For a deeper insight into the differences between the Open Source model and Commercially Written software I think everyone should read Eric Raymond’s truly excellent – The Cathedral and the Bazaar. Whilst Tim’s talk borrowed the title from Raymond’s seminal work, Tim only really briefly touches on the history of the Open Source Movement and the benefits of Open Source whilst Eric’s book and the collection of essays he presents within it provides a wealth of historical and anecdotal information that paints a wonderful picture of where and how Open Source started and why it’s been such a success.
I personally think anyone who considers themselves to be a software developer should read this book, not necessarily to advocate Open Source but to better understand one of the most important movements in the history of our industry.
Karas: Revelation
 Took bloody ages to get home last night there was a fatality on the local line between Birmingham International and Birmingham New Street which meant we had to find alternate means of travel to get to the city. By the time I got home I felt exhausted. Richard is working the late shift this week so I had the house to myself and decided to make some food and finally get round to watching Karas:Revelation, the long awaited sequel and conclusion to Karas:The Prophecy which I reviewed a couple of months ago.
The sequel picks up exactly where the first movie ended it’s a much darker movie than the first and the plot remains sophisticated and very complicated, but the movie answers all the questions that we were left with at the end of the first movie. One of my previous complaints was that the first movie didn’t focus a great deal on Otoha the hero of this saga which felt quite frustrating because we never really got a sense of who he was, or how he was chosen to be Karas. Much of the first half of this movie is devoted to Otoha and you learn who he was and how he first became a Karas. This part of the movie is extremely dark and bloody, I don’t want to spoil it, but you recall that only those who have known extreme sorrow can become Karas – well it’s fair to say Otoha fits that description.
In terms of it’s presentation and production quality this film surpasses the original – the seamless integration of 3d and 2d animation is absolutely stunning, and the soundtrack is brilliant! I really enjoyed the film – and found that I was engrossed from start to end – if you haven’t seen this series … then watch them – it’s anime at it’s very best!
Tutorial: Making my own Arrows
As I mentioned in an earlier post on Bow Maintenance, Richard promised to teach me how to make my own Arrows from scratch. I have documented the entire process below with pictures which you can see in more detail on flickr.
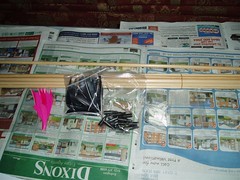
To begin with you need a number of items:
- A fletching jig
- 12 x 11/32 Wooden shafts .
- 24 x 3″ Parabolic Black Fletchings.
- 12 x 3″ Parabolic PinK Fletchings.
- 12 x Plastic Nocks
- 12 x Field Points ( 100g )
- A tenon saw
- Super Glue
- Taper Tool
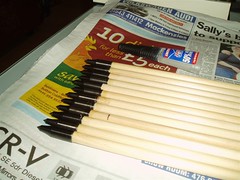
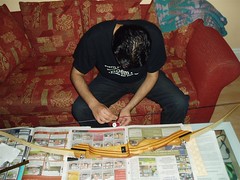
I bought all my equipment from Perris Archery and Quicks Archery. I should point out that you don’t need to buy pink and black feathers, you can buy an color you like but what you need to ensure is that you ave 3 times as many fletches as arrows you are making, and that each arrow will have two fletches of the same color, and single fletch, the cock feather, which should be a different colour. Below is a picture of all bits and pieces layed out on the table before we started …
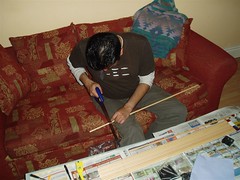
Step 1 – Taper and Nock the Arrows.
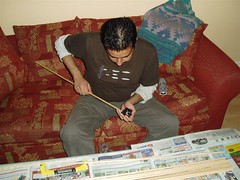
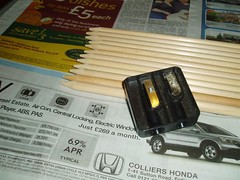
The first thing I had to do was Taper one end of each arrow. The Taper Tool is basically a special pencil sharpener that is designed to sharpen the end of a wooden shaft so that you can fit a plastic nock to it perfectly. The first picture below shows me using the Taper to sharpen the arrow, and the second picture shows all twelve arrows sharpened and the Taper Tool.
Ok at this point I am now ready to add the nocks to the arrows. Richard told me that with a dozen arrows I should have five with red nocks, four with white nocks and three with blue. This is because in field archery when you shoot at a target there are three coloured pegs from which you shoot – red, white and blue. Which denote the three distances from which you attempt to hit the target and thus score points. The coloured nocks denote which peg each arrow was shot from.
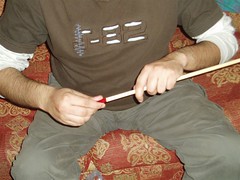
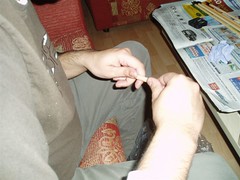
We fit each nock to the sharpened point by first pouring a few drops of super glue into the plastic nock and then twisting the nock on to the shaft. Any excess glue needs to be wiped off. The glue will dry very quickly so it’s important to ensure its a secure as possible. The first picture below shows me fitting a nock, the second shows all twelve arrows nocked.

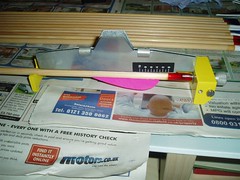
Step 2 – Cutting the shafts to the required draw length
Once the arrows are nocked, we then had to work out what my draw length was and then cut each arrow to that length. To determine the draw length Richard asked me to draw one of the nocked arrows on my bow and took some measurements ( didn’t take any pictures of this ). Richard then showed me how to cut the arrows to this length using a tenon saw, pictured below:
Step 3 – Fitting the points
Once the arrows are cut to the same length we then need to use the Taper tool again to sharpen the other end of each arrow. The metal points are fitted in the same way as the nocks, the only slight difference is that the taper tool sharpens to a longer point. Instead of pouring glue into the fitted point you spread the glue on the sharpened shaft to ensure maximum coverage. The fitted point is harder to get on and you need to ensure that you twist it on very carefully, if slip you might drive it into your hand which hurts:
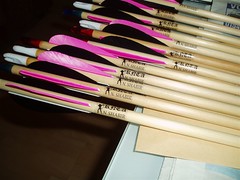
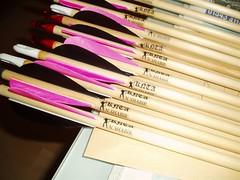
Step 4 – Fletching the Arrows
This is the slowest and most tedious of the activities. The fletches must be glued onto each arrow using the fletching jig. You first glue on the cock-feather. When you shoot and arrow the cock-feather always points away from the bow at 90 degrees, this ensures that the other two fletches dont strike the bow full on as the arrow flies off the string, as a result many archers choose to use a different coloured feather to ensure their arrows are always shot consistently.
You insert the fletching into a clamp and apply a thin layer of glue to its edge. The clamp and the fletching jig are magnetic this ensures that each fletching can be positioned perfectly. As you glue each fletching and remove the clamp you twist the end on the fletching jig which rotates the shaft to the next position and repeat this until all three fletchings have been glued on.
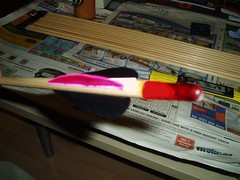

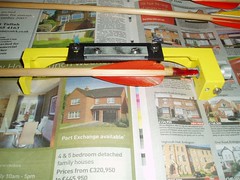
Once the arrows are flectched your basically done. However Richard and I spent some time designing and printing out some decals on transparent film for our arrows – these have the club logo on them and, in this instance, my name, in case I loose any arrows during a field shoot the organisers can always send them back to the club if they are recovered by other archers. Here’s a couple of pics of the finished product …
All in all it took about 90 minutes to make these from scratch under Richard’s expert tutelage. I found myself feeling a surge of pride when I finally strung one of the finished arrows on the bow, although the pink + black fletchings might not be to everyone’s taste they are certainly … distinctive … and look quite stunning. I can’t wait to shoot them! I found the experience to be very therapeutic, it’s the sort of thing you can do whilst watching a DVD ( as we did this evening ).
Disney on Ice
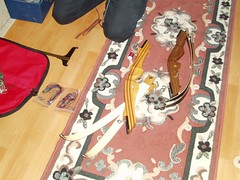
Me, Rich and Alex went to watch Disney on Ice on Thursday, it was a great show. Having been ice skating for the first time ever the night before ( and I’m still nursing the bruises! ) I had some appreciation for the skill involved by the performers who were skating, dancing and doing acrobatics all the way through the show ( I’ve put some pics up on flickr, click on the image below ).

It was a great night, I had a lot of fun felt like a big kid which I probably need to do more often. If you get the chance to see the show then I do recommend it, it’s a couple of hours of heart warming fun and I guess we all need that from time to time.
Learning to maintain my Bow
Earlier this week Richard taught me how to maintain my bow and arrows. It might sound pretty simple but it’s a labour of love. He first taught me how to dismantle and re-assemble the 28lb recurve bow I’ve been using. When it’s dismantled it looks like this (mines the lighter one):
Assembling the bow isn’t as easy as it sounds. Getting the arms on is trivial but stringing the bow is actually very hard. Richard showed me a number of techniques to do this and whilst I eventually did manage to do this, I have to admit I struggled a lot it requires strength and also letting go of the fear that you might snap the bow if you bend the arms too much – although he did stress that with all these things I should get better as I get used to doing it. Once the bow is assembled it looks like this:

In the picture above you notice a small metal T Square positioned on the bow. Richard taught me how to use this to work out the correct position to put a nocking point onto the string. The nock is found at the base of an arrow and is used to keep the arrow in place on the string, the nocking point on the string is therefore the point against which you ready your arrow before shooting. A nocking point ensures that your consistently releasing your arrows from the same point on the string which aids in consistency and therefore accuracy.
Once the nocking point is found, you then create the point by wrapping cotton thread around the string at that point until you have a small ball of string that the nock at the base of each arrow can press against. The pictures below show me and Richard doing exactly this …

Once the strings were nocked, Richard then taught me how to wax the strings to waterproof them this basically involved rubbing copious amounts of wax into the string. Whilst you can do this with the string off the bow, Richard taught me that its easier and better to do it with the string on the bow where it’s being stretched and therefore makes it easier to work the wax into it, heres a pic of Richard doing exactly that …

Once we’d finished doing this we put the bows down and then Richard taught me how to maintain the arrows. This basically involved checking each arrow and ensuring that all the fletchings were in place, that the point of the arrow was in tact, and that the nock at the base of each arrow was also in tact. He showed me how to replace broken points and nocks, and also how to use a Fletching Jig to perfectly place fletchings on an arrow:
I learnt a great deal during that that evening from Richard, and it gave far more of an appreciation into how much effort I need to put into maintaining my archery equipment. We ordered some new shafts, fletches, points and nocks so I can create my own set of arrows … I cant wait for them to arrive, I’m actually really looking forward to creating my own arrows from scratch.
You can view all the pictures above, and more, here on flickr.
What should I read next?
Came across this really interesting service called What Should I read Next? Think of it like a Last.fm for books. You tell it the name of books your reading or particularly books you’ve enjoyed, add them to a list, and it recommends other similar books you might enjoy. It’s really simple to use. I’ve only really started playing with it but so far I’m impressed with the suggestions it makes and how simple it is.
Microsoft brings Windows Live services out of beta
Microsoft has finally released out of beta it’s suite of Windows Live Services, offering users half a dozen downloads and web apps.Among the offerings are IMAP-enabled Windows Live Mail, Windows Live Writer (one of my favourite tools!) for offline editing and uploading blogs, A Picture Gallery application and a parental controls application for web browsing.
This offering by Microsoft does echo Google’s Google Pack, which was also an online/offline software bundle. The difference between the two is that Google’s offering includes products from other vendors whilst Microsoft’s offering does attempt to tie you more to Microsoft’s own Platform.
I’m not complaining though I like variety …
Meeting Miser
Euan Semple mentioned this fun little tool calledMeeting Miser during his opening keynote at our Talis Insight Conference. The in-browser timer uses actual or estimated salaries of everyone in the room to tally up the cost of a meeting by the second, the minute, or in total – very useful for those who want to point out the cost of unnecessary meetings.
Talis Insight 2007
Day One
I’ve had a great day today, it’s the first time I’ve attended Talis Insight, and I have to admit I was blown away by the exhibition stands and the whole atmosphere at the conference. I think people often forget how much effort goes into organising an event like this, and I think both our Marketing and our Infrastructure team deserve the utmost praise for organising everything! It really was amazing to see. I spent most of the day in the Talis Zone talking to delegates and demonstrating some of our new products. Its a wonderful feeling showing off some of our new products, and getting immediate and very positive feedback from people I’ve never spoken to before.
As busy as the day was I did manage to take a few pictures which are now up on Flickr.